


(To take the virtual tour, please log into your Grubhub Corporate account first)
Creating Meal Credits
We’re excited to share our latest product enhancement related to meal credit creation and people assignments. When building and managing meal credits, you’ll notice an enhanced look, feel, and usability that enables you to create meal credits faster and with fewer steps; perfect for one-off events or celebrations for group sizes big and small!
To get started, hover over “Meal credit settings,” click “Meal credits,” then click “Add meal credit.” From there, take the time to customize each of the parameters of your meal credit!
- Hover over “Meal credit settings” and click “Meal credits”. Then, click “Add meal credit”.

- Name the meal credit! The meal credit name will be visible to anyone you extend the budget to, and will also be visible in your invoice reports, so name it accordingly! We suggest including the name of the event or department associated with the meal credit so it’s easy for your employees to identify and helpful for billing reconciliation
- Note: The meal credit name is limited to 30 characters.
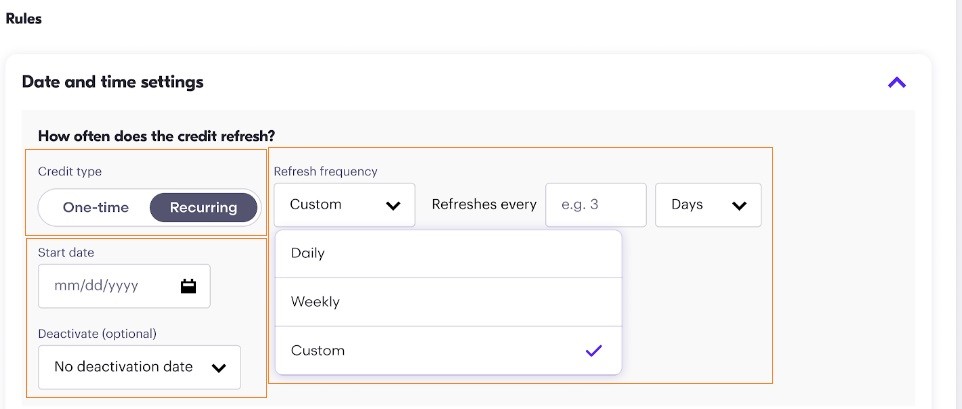
- Customize the meal credit date & time settings.
- Choose your credit type: One-Time or Recurring
- Choose your credit duration: Day(s), Week(s), or Custom
- NEW: For multi-day or multi-week budgets, select “Custom” and indicate how many days or weeks the credit should be active for. If set to recurring, that will also be the refresh frequency. This options is best for budgets that should run every 2 days, 3 days, etc. or budgets that span 2 weeks, 3 weeks, etc.
- Choose your credit start date.
- If you’ve set your budget to recur, you also have the option to set a credit deactivation date!
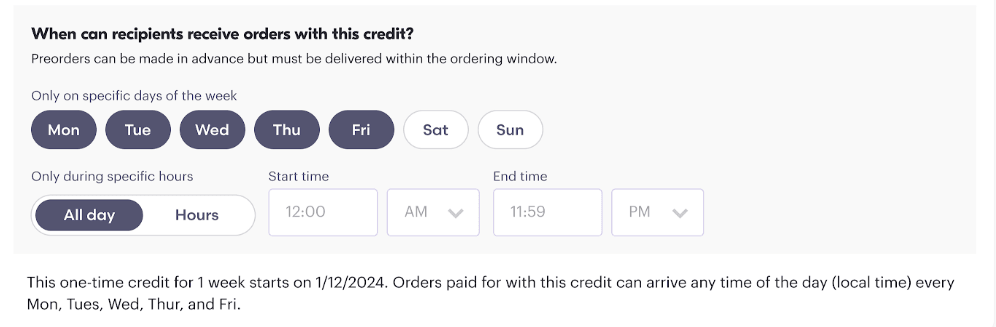
- Select the allowable delivery window. Indicate the time of day you’d like folks to be able to receive orders. Credits default to “All Day,” but click “Hours” to narrow down a window of time that orders should be received, like 10am – 2pm for lunch or 7pm – 11pm for overtime.
- Please note that when indicating a specific timeframe, orders can still be placed in advance, but they must be scheduled to be delivered or picked up within the timeframe you’ve designated. For any recurring budgets or budgets that last longer than a day, select the specific days of the week you’d like the credit to be available to employees.
- Common Credit Scenarios Include:
- One-time, daily budgets are best for single day events, like happy hours, meetings, or team celebrations.
- Recurring, daily budgets are best for meal credits that are active on specific days of the week, like weekly on Wednesdays only, or every Tuesday and Thursday.
- One-time, weekly budgets are best for longer-term meal extensions, like employee appreciation week, or holiday meal credits.
- Recurring, weekly budgets are best for programs with weekly as opposed to daily budgets.
- NEW: For multi-day or multi-week budgets, select “Custom” and indicate how many days or weeks the credit should be active for. If set to recurring, that will also be the refresh frequency. This option is best for budgets that should run every 2 days, 3 days, etc., or budgets that span 2 weeks, 3 weeks, etc.
- COMING SOON: Recurring monthly budgets!
Next up, expand each of the remaining Rules to customize your meal credits just the way you want!
- Under “Locations,” you can choose whether the line of credit should be available to use at any delivery address, or if the line of credit should instead be locked down for use only to a specific geographical location. Make sure that any location you’d like to lock your delivery down to is built out in the “Company Details” section of your Admin Portal!
- Under “Order Settings”, you can choose how your employees order their meals. Checking all options provides the most flexibility.
- Under “Checkout Display Settings,” you can choose whether or not the budget amount will be visible to those ordering, as well as whether or not you’d like to enable your team’s Company Ordering Policy (if applicable)! For questions about our Company Ordering Policy feature, reach out to your Client Success Manager!
- Under “Diner notification,” you can choose to enable an automated notification to employees letting them know when their meal credit becomes available! By clicking “Yes,” we’ll send a customized, one-time email the morning the meal credit begins – so long as you create and assign meal credits the night before. Diners added to an existing budget will receive an email the morning after they’re added. By clicking “No,” you’ll be opting out of any email notifications announcing the credit.
- Under “Expense Settings,” you can choose to require any sort of expense code/comments to be collected at checkout by whoever is placing the order.
- Under “Merchant Restrictions,” select applicable merchant restrictions if you do not want individuals to use their meal credit when ordering from specific merchant types.
- Save your meal credit customizations! Once you have customized your meal credit to your liking, click “Save Meal Credit” to save down what you’ve built!
- Assign Employees & Groups to your Credit! Scroll down and assign your meal credit either directly to individual employees, or select the group(s) you want associated with this meal credit.
- When you assign your meal credit to individual employees, first select the budget, then proceed to select the employees who should have access to that credit by clicking “Assign Person.”

- When you assign whole groups of employees to your meal credit, first select the group, then indicate the budget amount for the entire group, and click “save.” For more information on how to create a group of employees that you can connect to a meal credit, check out Group Management!

- When you assign your meal credit to individual employees, first select the budget, then proceed to select the employees who should have access to that credit by clicking “Assign Person.”


Meal Credit FAQs
Can I set up specific budgets for holidays?
Yes. Meal credits can be created as many times and in any time frame you would like.
Can I change a meal credit after it starts?
Yes. However, the date, frequency and order window cannot be changed once the meal credit is created. You will need to deactivate the meal credit and create a new one.
My employee is not seeing their meal credit balance and/or is being asked to enter their personal credit card upon checkout.
There could be a few reasons. Check to make sure all below items are addressed. If you’re still facing this issue, please reach out to your CSM!
- The account your employee is ordering from is not tied to a corporate account. If the employee is tied to the corporate account, please check that a welcome email has been sent and that the employee registered their account.
- The user is signing in using the wrong email.
- The user is on the account but not tied to a group.
- The user is tied to a group that is not tied to an active meal credit.
- The order exceeds the amount budgeted to the user (credit card may be required to cover overages).
- The user is attempting to order outside of your company’s allotted ordering times.
- Meal credits are often location-specific. Is your employee trying to order to the office or elsewhere?
- The user may try clearing their cache/cookies, using Google Chrome as the web browser and turning off any active VPNs in case it is a security setting.


